Example 1
This example as mentioned includes an extremely barebones interaction system made with Blueprints. This is something you may utilise if you desire more types of interaction. Feel free to gut the samples as needed, it’s advisable to make copies though to avoid affecting the test level.
The basis of an interaction system is very simple. We aim to make a system that allows an object to have a specific behaviour regardless of it’s class or inheritance chain. Fortunately, programming has an answer for this in the form of an interface, a way of making class-agnostic behaviours. What an interface allows us to do is create a function that we can implement on any object, without caring what it’s type is.
In Blueprints, an interface is an asset you create in the content browser as such: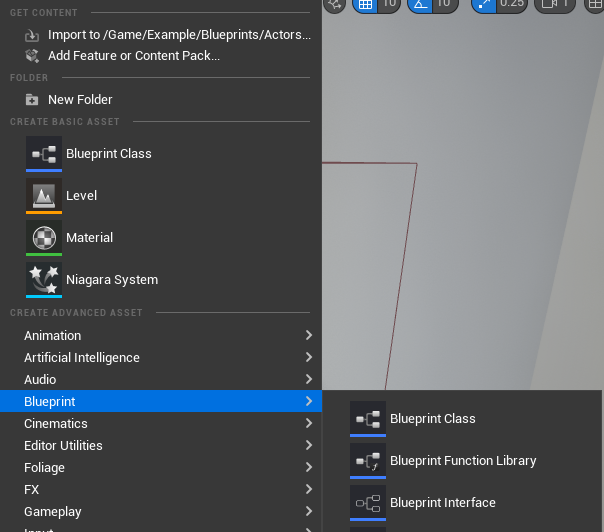
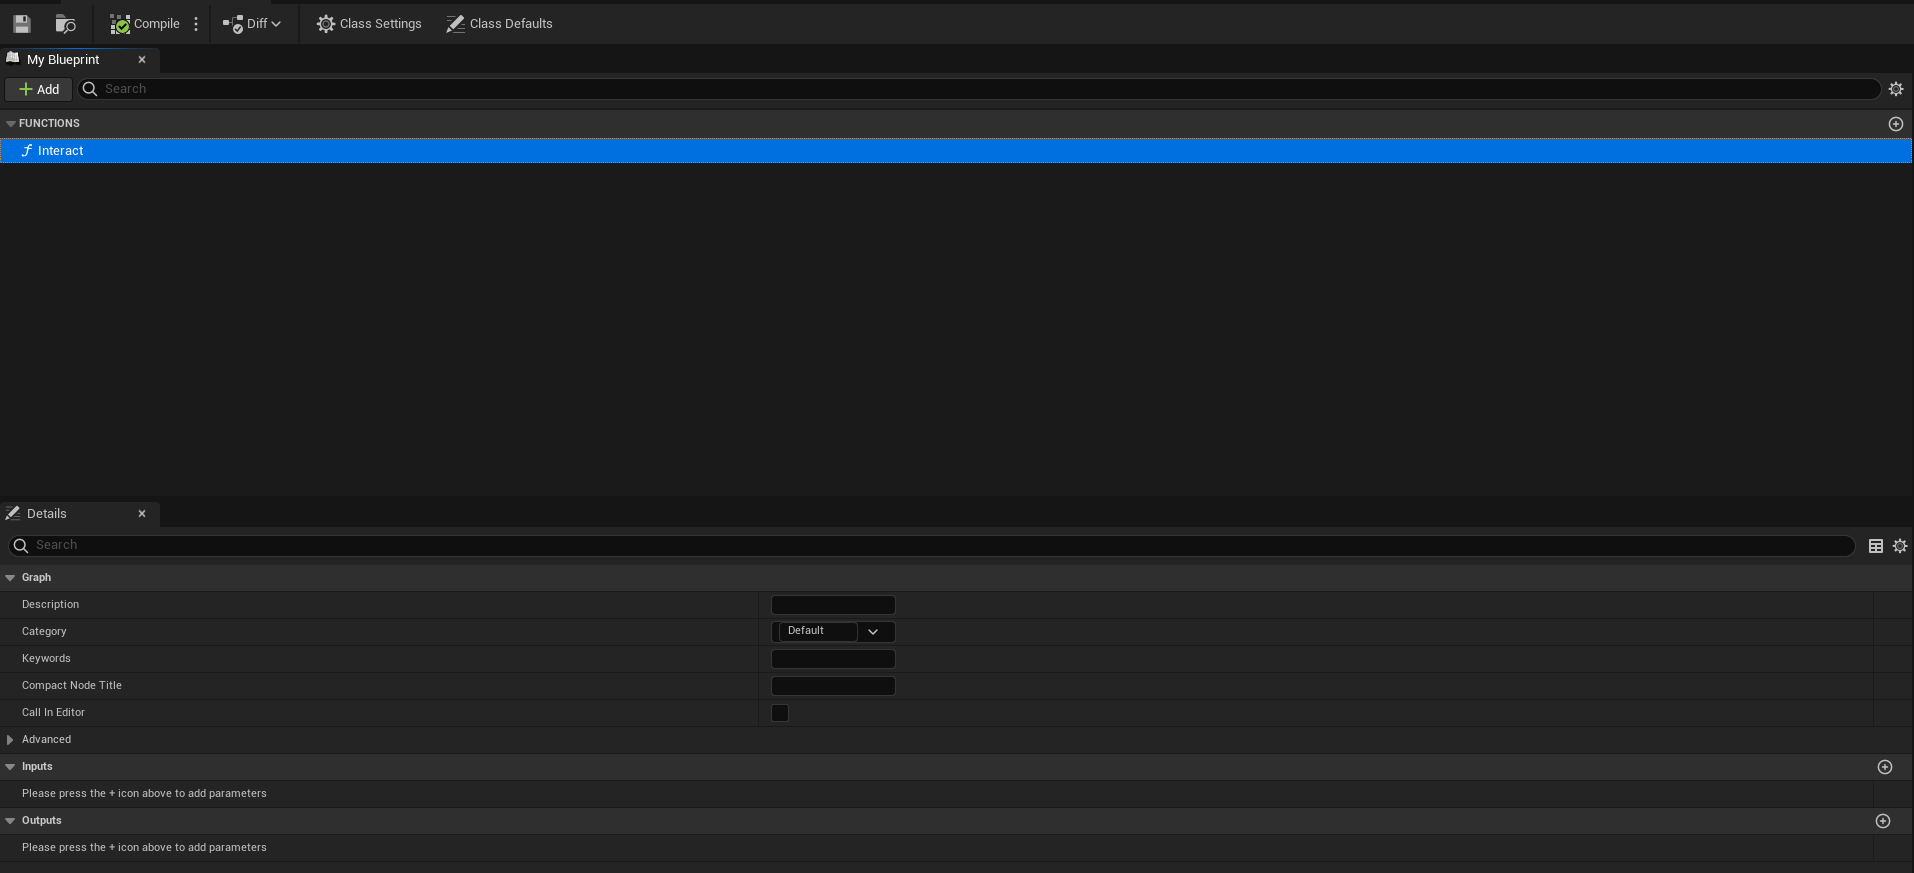
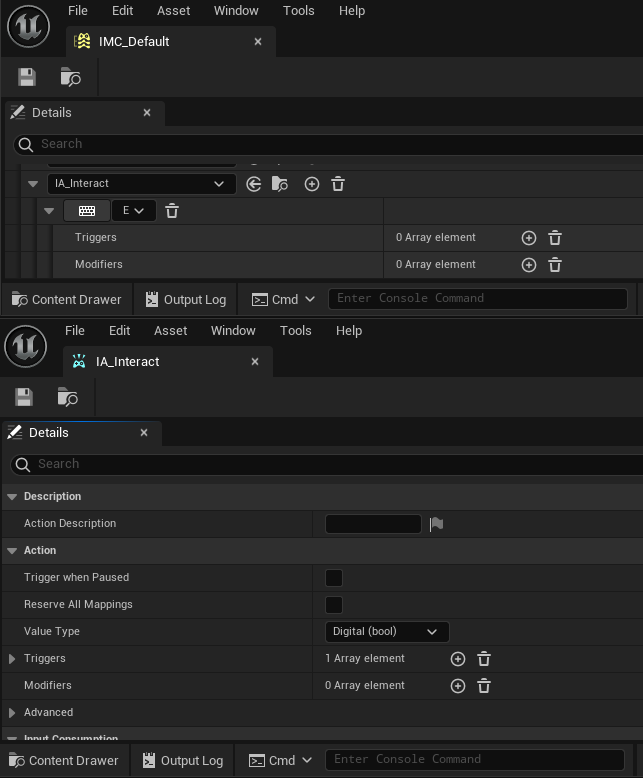
Once created, it allows us to specify our functions that we can implement. For the purposes of this, we use a single one, the Interact function, which requires no inputs or outputs.
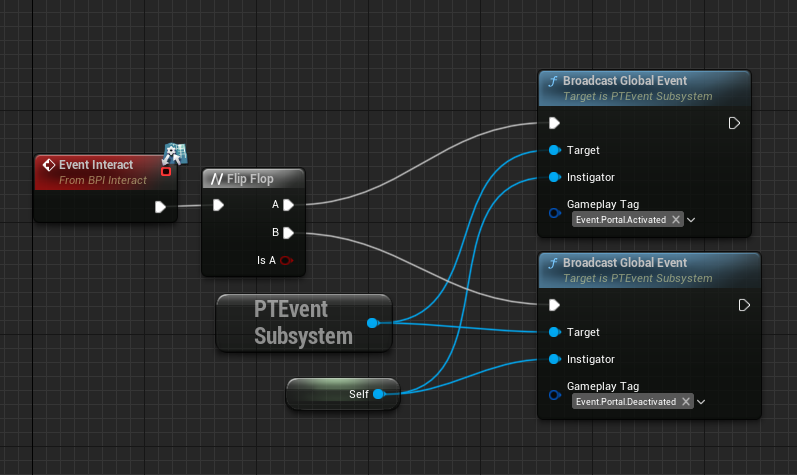
This interface can then be implemented where-ever we want by going into the class settings and adding the interface to the Implemented Interfaces. For our purposes we hook this up to a flip flop, which is a logical structure that “flips” and “flops” it’s execution, switching from executing the first branch, to the second, vice versa with each new execution. We leverage this to make a toggle button, with the interaction toggling between sending an Event.Portal.Activated tag, and an Event.Portal.Deactivated tag. This is all we need to communicate with components, the single Broadcast Global Event node.
On it’s own, this doesn’t do much, as we still need the character to interact with things. To do this, we take advantage of the existing Third Person Character from the Third Person Template Project. This already has some inputs setup, and we setup a new one called IA_Interact, and add it into what the input system refers to as the InputMappingContext, which lets us bind a key to the input.
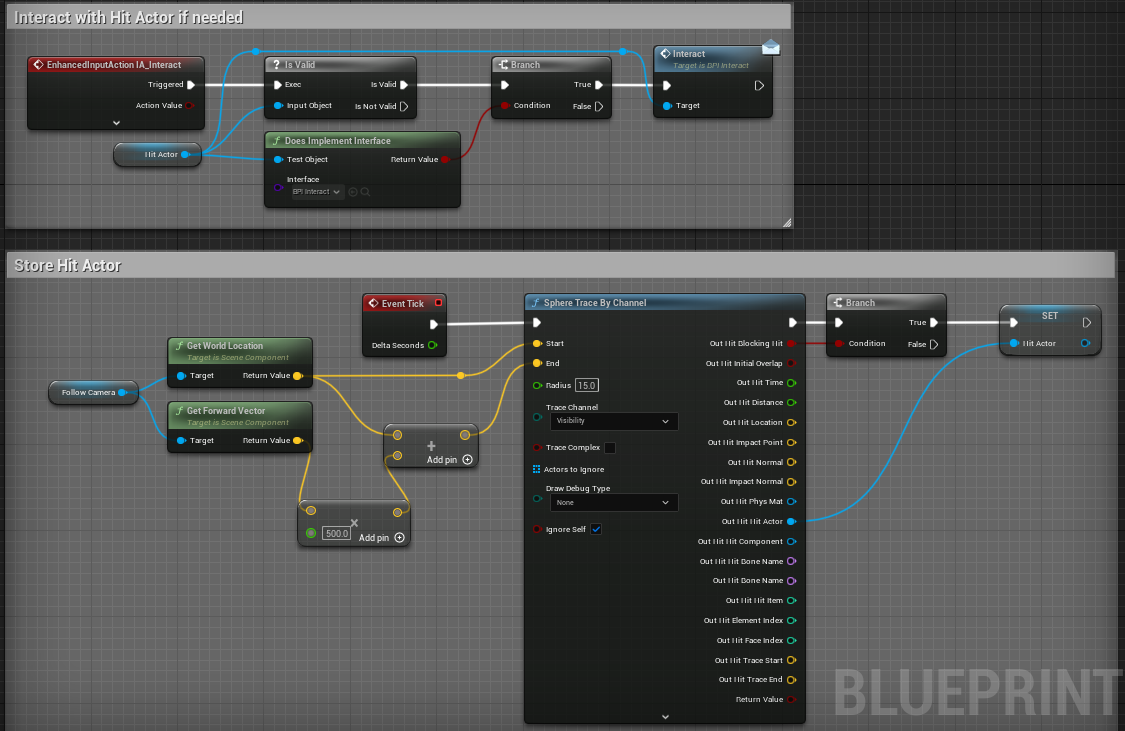
Once we have done this, we can create an event for this input in our Character, allowing us to perform interactions. However, first we do some setup to allow us to find the event to interact with. On an Event Tick, we shoot a hitscan in front of the camera, and store a reference to the actor we hit. This is the actor we can later call the interface function on. When the interaction event is activated, we first check the validity of the hit actor, so that we know we have hit something. Secondly, we check if the interface has been implemented, as there is no point executing it otherwise. Lastly, we call the interface function, which with some Unreal Magic, will call the Event Interact on the Podium BP.
Note
The little coloured dots you see on the coloured wires are a handy QOL feature of Blueprints called “Reroute Nodes”. They allow you to divert the path of the wire to avoid what is affectionately known as “Blueprint Spaghetti”. To add one, simply double click on any coloured wire.
Example 2
This example, and the subsequent ones focus more heavily on making responses, as making triggers are fairly straightforward. This is probably the simplest example of all, showing how to add properties and custom code to a response. Firstly, we create a new Blueprint inheriting from PTBaseResponseObject. More is touched on this class in the Response Objects page.

After this, we can open up the new blueprint into the Blueprint Editor. For simple responses, we only need to override a single function, the Receive Execute function. This can be done by navigating over to the Functions section of the editor and clicking Override. This will place a red event node onto the graph, and we can begin setting up our response.
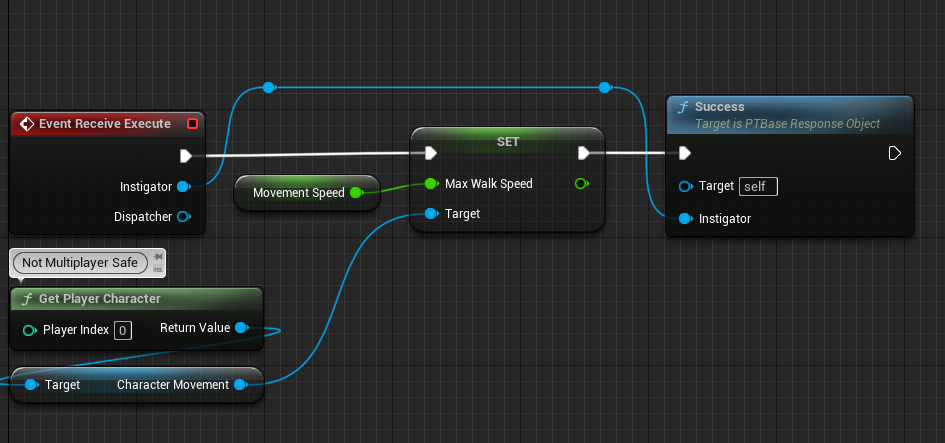
In this example, we have very few nodes. Firstly, we have a variable called Movement Speed. This is setup in the Variables section and is what allows us to define properties that will appear in the Details Panel. For our case a single float value representing our desired speed suffices.
Note
In the details of this variable, Instance Editable must be ticked if you wish it to appear in the details panel when adding the response to a component.
For actually invoking the speed change we first need to get the Character, and it’s movement component. Naturally, this isn’t fit for any game, as not every game is forced to use a Character Movement Component for it’s movement. For this reason it has not been included as a base response. We use some quick, but dirty code for this, making use of GetPlayerCharacter to retrieve our character reference. This is not safe for multiplayer, as the server will have multiple player characters, hence the Index parameter on the node. In our case it suffices fine however. Once we have a character, and consequently the movement speed, we can now just directly set the MaxWalkSpeed variable to our previously made float variable, giving us our desired increase.
As a final point to making any response, we must call Success.
Note
If your response chain halts after calling your custom response, you’ve likely forgotten to call Success. This is necessary in order for the component to move onto other responses
Example 3
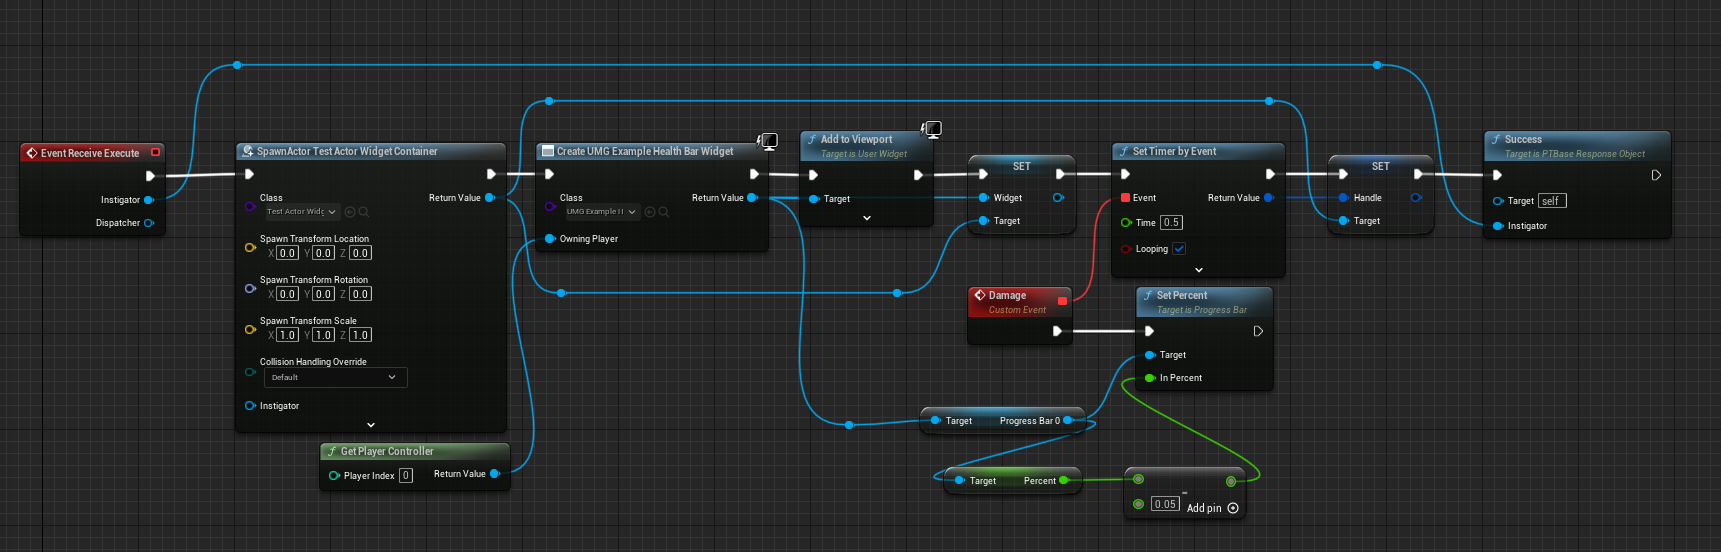
This example is a more complicated example of creating a custom response, handling it’s own persistent behaviour. Firstly, we once again create our subclass and override Receive Execute. This time however, we initially spawn a custom actor we made. This actor is empty, except for containing a reference to a widget, and a Timer Handle. No functionality is needed with this, it is simply to keep some objects alive and accessible when we clean them up later on, when exiting the trigger. This step is very necessary, as completion of a response does not mean the object is destroyed. The object is still very much alive and active, just doing nothing.
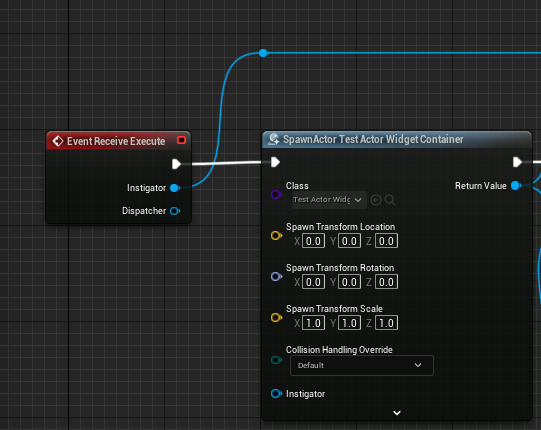
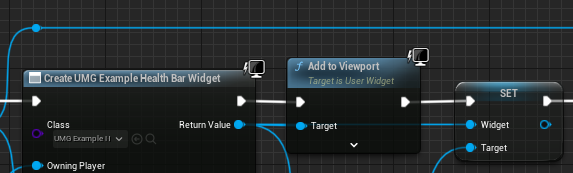
Once the actor is made, we create a simple test widget and assign it to our player controller. This widget is very simple containing a progress bar representing a fake health bar. This widget is then added to the viewport, before setting the widget reference in our temporary actor to it (The create widget node outputs the nice handy reference we need). After this, we begin a timer.
Timers are unusual in Unreal Engine, being one of the few things making use of the red Event pin. This event represents a callback, in our case with a looping timer every 5 seconds, it represents the function we should execute each time the timer goes off. It’s a common beginner mistake to hook the event up to the event creating the timer. Do not do this, if it helps, read the logic out loud bit by bit. We then set a handle to this timer, ensuring we can clear it from other places should we need to (hint: we need to). Again, we report success so we can move onwards.

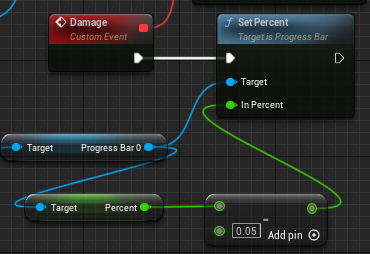
When the timer executes, it calls into a custom event we have made called Damage. In a real game, this might affect a health value on a health component on whatever walks into it, however for simplicity we fake it by just manually decreasing the value of the progress bar by a corresponding 0.5 units.
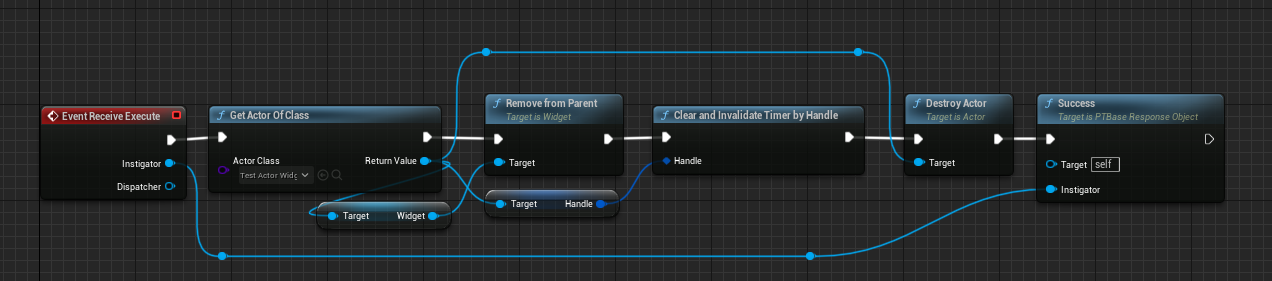
Now it’s on to the cleanup, which is another custom response. This one is much simpler. Firstly, we GetActorOfClass, of the type of our temporary actor. Since there is only one in the world in our example, this is perfectly safe to do. We can then retrieve the widget reference from it and call RemoveFromParent allowing the widget to be removed from screen and be destroyed by the garbage collector now nothing relies on it. After that, we clear our timer, so we’re not still trying to take damage on a widget that no longer exists. Finally, we destroy our temporary actor and report success. With everything cleaned, everything is prepared for another execution should we want one.
Example 4
This example is once again quite simple, and instead shows subclassing another response. Much like the other steps the initial step is to create a response subclass, however this time we want to pick the response we want to subclass, not the base. In our case, we make our child’s parent the Speed response.
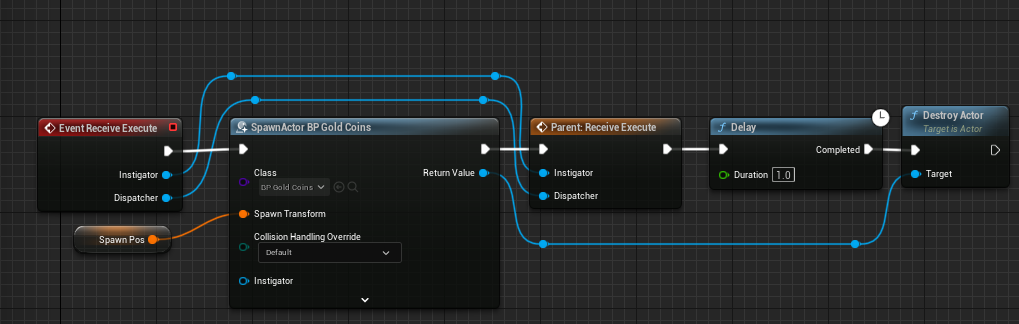
We first create a Transform variable for a spawn point, as this response will spawn a pile of coins and destroy it after a second. We do this in the same way as Example 2. Now, in our Receive Execute override, we spawn the BP_GoldCoins at that specified transform. We then invoke a Call To Parent
With Object Oriented Programming, the concept of calling through to a parent implementation is a common theme. It allows a child to do things the parent does, and new things, or completely change things. In our case, it allows us to invoke the original speedup. Following this, we utilise a delay node for a 1 second halt before destroying the coins.
Note
Since this is persistent behaviour, it goes after the success. While we haven’t manually invoked success, it is naturally invoked via the parent call. Delaying beforehand would spawn the coins, then wait a second before we speedup, which we do not want.